Viewing All Posts By
admin
What is the Beacon WordPress plugin?
I’m Kevin and I’m going to show you how you can use WordPress to create and promote an original book in just a couple of minutes.
The Beacon plugin works by combining legacy blog posts into a single, high quality eBook.
So the first thing you’ll need to do is choose which posts you want to include in your book. You can search for a specific post or you can filter by category.
So you might want to create a book based on your most popular articles, or a particular topic that you’ve written a lot about.
When you’re happy with the content just click ‘create eBook’ and this is where the fun starts.
The book has now been created and on the right hand side here you get a preview of what the finished product looks like.
And on the left hand side here you can change the content.
You can redesign the book with the click of a button and even add different images from the free stock photo library.
Under the pages tab you can see all the articles that we imported from WordPress. We can edit this content or just leave it as it is.
We recommend that you combine your blog posts with additional pages to bulk up your book as well. In this example I’m adding a quick table of contents page.
Now let’s pick a colour scheme that suits the rest of the book.
And while we’re here we may as well add some fancy typography.
And since this layout is a bit boring I’ll change that too.
And I want to reorder these pages so the table of contents comes right after the cover page.
Ok, so now that I’m happy with the content and design of the book, let’s publish it.
And there you have it. In just a couple of minutes we’ve created an incentive for people to join your mailing list which will help boost conversions in no time.
You can download the plugin from www.beacon.by/integrations
Support for Russian alphabet
The following fonts in Beacon support Russian characters:
-
Arimo
-
Merriweather
-
Noto Sans
-
Open Sans
-
Playfair Display
-
Roboto Slab
-
Ubuntu
If you would like to request another font be added to the system, please email [email protected] with details of your request
What is the Beacon for Hubspot integration?
Video Demo
Video Transcript
In this quick video I want to show you how easy it is to convert your existing Hubspot content into a beautiful eBook.
The first thing that you need to do is connect your Beacon account to your Hubspot account. This can be done with just a couple of clicks.
You then choose what content you want to include in your book by either searching for a specific post, or selecting from this list.
Your chosen articles appear on the right hand side and once you’re happy with the contents just click ‘create ebook’.
You can choose from a range of pre-designed themes, or you can create your own. For now let’s go with this theme.
As you can see, all our content has been imported, including images. Text formatting such as headers, links and quotes have also been preserved. You can edit the text using this area on the left and you can even add new pages if you need to.
Since a blog post will typically take up more than 1 pdf page you might want to adjust how your content flows from page to page. For example, in this article the page break occurs mid way through a line so let’s just add a bit of extra space to prevent that.
As you can see, all the other pages that we have imported are here too. And we have also automatically added a call to action page at the end of a book so we can point readers to the next step in the buying cycle.
Connecting WordPress to your Beacon account.
In order to use the Beacon for WordPress plugin you must first connect your Beacon account to your WordPress account.
After you have installed the Beacon plugin and once you are logged into your Beacon account, click the ‘Connect’ option in the Beacon submenu:
![]()
WordPress will then be connected to Beacon automatically. If you then click ‘Back to WordPress’ you will be able to create your first publication.
![]()
If you are not logged into your Beacon account already, you will be asked to log into your Beacon account to connect. Enter your Beacon account email and password and click on ‘Connect WordPress’.
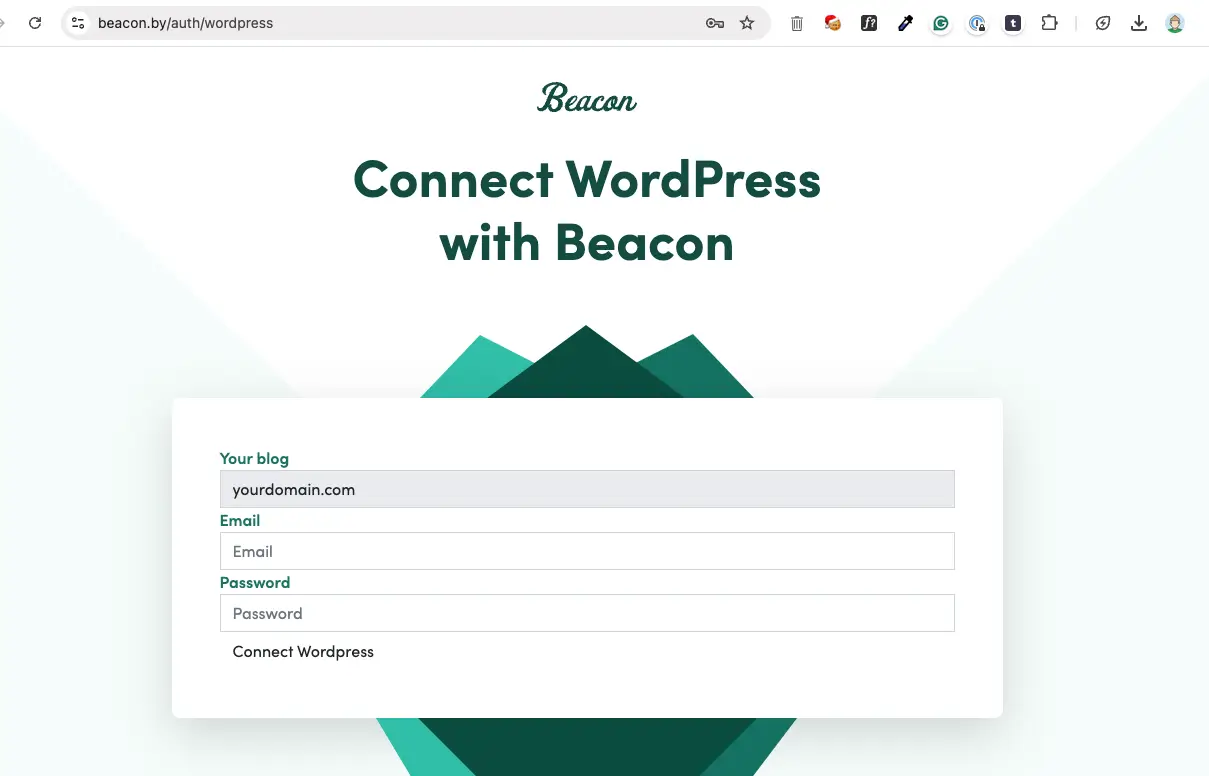
You will then get a message that says “Your blog has been successfully connected to your Beacon account.” Click on the “Back to WordPress” button, as shown above.
You will then be redirected to the Beacon Dashboard in WordPress and you are now ready to create your first lead magnet or upload your first resource.
Do Google Analytics work for the Traditional PDF version?
No, unfortunately PDF as a format does not support analytics reporting. Beacon analytics only report on traffic to the web version of your publications.
Installing the Beacon WordPress plugin
Steps to install the WordPress plugin
Step 1: Log in to your WordPress admin panel, click ‘Plugins’ on the left hand menu and select ‘Add New’
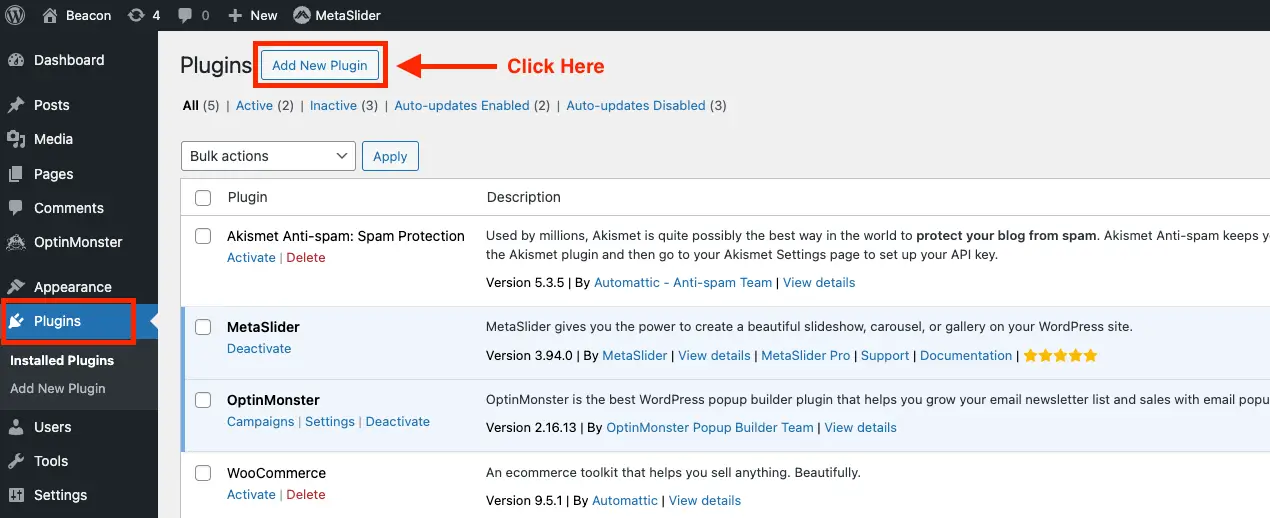
Step 2: Search for ‘Beacon eBooks’
Step 3: Click ‘Install Now’
Step 4: Click the ‘Activate’ button.
Step 5: Finally, connect your Beacon Account to the WordPress plugin.
![]()
Before connecting to your Beacon account, ensure you’re logged into your account here → https://beacon.by/login
WordPress Directory
You can find the Beacon plugin here: https://wordpress.org/plugins/beacon-by/
Video Demo
The Free Plan
Summary
When you create a Beacon account you are automatically assigned to The Free Plan. There is no trial period and you can keep your free account for as long as you want.
Limitations Of The Free Plan
Beacon logo – your lead magnets, resource libraries and lead capture forms will always include the Beacon logo.
50 leads – you will only be able to send your first 50 leads to your email marketing tool.
25 resources – you will only be able to add 25 resources to your Resource Libraries.
To remove these limitations you will need to upgrade to a paid plan.
Features Not Available On The Free Plan
Team members – you won’t be able to invite other people to share your Beacon account.
Download PDF – you won’t be able to download lead magnets created in Beacon.
Sender Signature – whenever a lead magnet or resource is emailed to your customers it will be sent from our email address ([email protected])
Custom domains – you won’t be able to publish Smart PDFs or Resource Libraries to your own web address.
Full template library – you will only be able to access a limited amount of lead magnet templates.
Template creator – you will not be able to create your own lead magnet templates.
To get access to these features you will need to upgrade to a paid plan.
The Professional Plan
Summary
The Unlimited Plan gives you that ability to publish as many eBooks per month as you require. The eBooks can be published in both Smart and Traditional PDF formats and will not include the Beacon logo.
Limitations
With the Professional Plan you can only use one custom domain with your Beacon account.
You will not be able to share your Beacon account with other people.
You will only be able to add 1 Sender Signature to your account.
Setting up a custom domain name
What Is A Custom Domain?
Whenever you publish a Smart PDF with Beacon, the Beacon website address is included in the URL. It looks like this:
This is the default setting but it might confuse some of your readers. They’ll probably see that and think “Huh? What’s a Beacon?! I don’t know these guys!”
Don’t worry, we won’t get offended but it’s probably a good idea for you to clear up any confusion sooner rather than later so you don’t risk the trust of your audience.
Fortunately, the custom domain feature makes that easy! Once set up, you can use a subdomain tied to your own web address.
Here’s an example of how it might look:

If you are on either the Beacon Professional Plan or Agency Plan you can make the web versions of your lead magnets available at a domain name of your choosing.
Configuring Your Custom Domain
In order to configure this setting you must first access your domain registrar account and add a CNAME record. Here’s how to do it:
1. Sign in to your domain registrar account (e.g. godaddy.com etc).
2. Find the page for editing your domain’s DNS records. The page might be called something like DNS Management, Name Server Management, or Advanced Settings.
3. Add a CNAME record for your custom domain. Here is an example for an imaginary domain called yourwebsite.com:
Record Type: CNAME
Name/Host/Alias: ebooks
Destination: domains.beacon.by
4. Save and wait for the new record to take effect, which can take up to 72 hours to propagate across the whole internet.
Your Custom Domain will now be: ebooks.yourwebsite.com.
* Note: For CloudFlare users
Ensure that you have set proxy status to DNS only
Read more about Cloudflare’s proxy status here.
* End of Note: For CloudFlare users
Next you must add this custom domain to your Beacon account. You can do this by visiting the Custom Domain Section of the settings page:

Next, click this button to add a new custom domain:

Add the custom domain that you set up earlier:

If you have a favicon for your custom domain you can link it also.
When you’re finished click the ‘add custom domain’ button:

Finally, click save. It may take up to 72 hours for the changes to take full effect.
Please note you will still access your Beacon account via the main login panel at beacon.by/login.
Keep in mind, you’ll need to assign the custom domain to each publication individually for it to function properly.
Upgrading your Account
Step 1
Log in to your Beacon account and click ‘upgrade your account’ from the side menu:

Step 2
Choose your plan by clicking on the relevant option:
