Viewing All Posts By
admin

Editing Content Cards

Video Overview

Customizing Content Cards

When you hover over a Content Card on the page you will notice a pink dotted border appear around the content element. In this example the mouse is hovering over the Headline element:

When you click on a Content Card on the page a blue menu will appear on the left hand side:

This blue menu is how you make adjustments to the appearance of the selected Content Card.

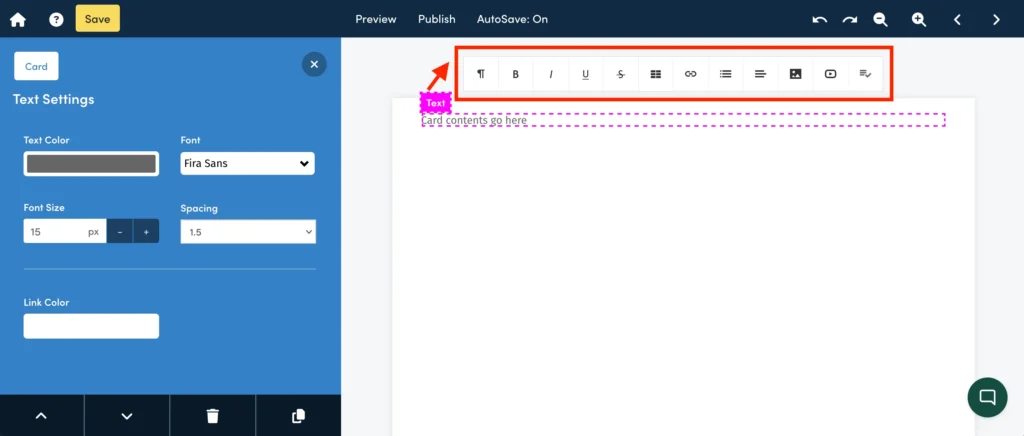
The options in this blue menu will be different for every type of Content Card. For example a Headline Card will have different options from the Gallery Card.

Sub Menu

Within the blue menu there is a sub menu that appears at the bottom:

This sub menu helps you to:

  1. Reorder a Content Card up the page
  2. Reorder a Content Card down the page
  3. Delete a Content Card
  4. Duplicate a Content Card

For more information on moving Content Cards, please see this article.

Search Engine Settings

Please note that Search Engine Settings are only applied to Smart PDFs, not Traditional PDFs.

Because Smart PDFs are built with web technology they can be easily indexed by search engines. To access the Search Engine Settings for your publication click the ‘Publish’ link on the editor screen:

Then click the ‘Search Engine Settings’ link to show the options:

There are 5 different search engine settings that you can adjust:

1. Prevent search engines from indexing this publication
If you do not want search engines to index your publication you should check this option.

2. Hide company name in the title bar
Beacon will by default display your company name in the title bar of the browser window when someone accesses your Smart PDF. If you do not want your company name to be shown you should click this option.

3. Meta Title
“Title tags are displayed on search engine results pages (SERPs) as the clickable headline for a given result, and are important for usability, SEO, and social sharing. The title tag of a web page is meant to be an accurate and concise description of a page’s content.”

– Excerpt from Moz.com

4. Meta Keywords
“Keywords are ideas and topics that define what your content is about. In terms of SEO, they’re the words and phrases that searchers enter into search engines, also called “search queries.” If you boil everything on your page — all the images, video, copy, etc. — down to a simple words and phrases, those are your primary keywords.”

– Excerpt from Moz.com

5. Meta Description
“Meta descriptions are HTML attributes that provide concise summaries of webpages. They are between one sentence to a short paragraph and appear underneath the blue clickable links in a search engine results page (SERP).”

Save Changes

If you make any changes to the Search Engine Settings you should click ‘Publish’ or ‘Update’ at the bottom of the screen to save the changes:

How To Configure Template Colors

When you create a new publication we recommend setting up your template colors. This will help you to save time and ensure brand consistency throughout the document.

To access the template colors, click the ‘Default Styles’ link in the Document Settings tab:

You can set up as many as 4 template colors:

In this example I have set up 2 colors, green and yellow:

Now, whenever I want to change the color of an element you can see the template colors appear at the bottom of the color swatch.

In this example I have clicked on the yellow square to ensure that this headline uses Template Color 2:

You can use template colors wherever you see a color picker. In this example I am changing the background color of the page to be Template Color 1 (green):

Changing Template Colors

If you change a template color via the Document Settings tab, the color will update everywhere it has been used throughout the document.

In this example I am changing Template Color 1 to be blue:

When I made that change, the page background automatically updated to reflect the new value of Template Color 1 (blue).

For more information on changing the default template colors please see this article.

How do I change the colors throughout an entire document?

All Beacon templates have a range ‘template colors’ associated with them. If you change one of the template colors, that color will be updated wherever it was used throughout the document.

This is useful if you need to quickly change the colors used throughout a document.

You can access the Template Colors for a document by clicking the ‘Default Styles’ link in the Document Settings area:

In this example, Template Color 3 is set to yellow:

If we change that color to pink, every item that used Template Color 3 in this document will also be updated. You can see that here on the cover page:

And on the Table of Contents:

How to move elements on a page

First, click on the element that you want to move. In this example I have clicked on the image:

When the blue menu appears at the side you will notice 2 arrows in the bottom sub-menu. Click on the ‘up’ arrow to move the element above the preceding element:

As you can see, the image now appears above the headline on the page.

You can use the ‘down’ arrow to move elements down the page:

Moving Content Within Containers

When you select a Content Card that is within a Container you can only move that element up or down within the Container. It is not possible to move it out of the Container.

Reordering Columns

You can change the order of Columns within a Column Group by using the same technique.

First, click on the column that you want to move:

Then click the relevant reorder button in the sub menu.

If we wanted to move Column 1 to the end of the row we would click this button twice:

As you can see, Column 1 has now been moved to the end of the row.

Creating your first lead magnet

You can create a lead magnet from scratch or by importing existing content (like from your blog).

1. Click the “Create New” button on your dashboard and select ‘Lead Magnet’

2. Choose a format for your lead magnet:

If you’re not sure which lead magnet format to choose then check out this article that explains the differences between each.

3. Import content from your blog (optional)

Some people like to recycle old blog posts into lead magnets. This is a quick way of getting renewed value from existing content but if you don’t have any suitable blog posts then you can just choose ‘No’ here.

4. Choose a template for your lead magnet

That’s it! Once you choose your template you can move on to editing your first lead magnet.

Choosing A Lead Magnet Format

Beacon helps you to create 5 different types of lead magnet:

1. eBook

An eBook is a longer resource that gives a comprehensive insight into a particular topic.

eBooks are one of the most popular lead magnets because they help you to show the depth of your knowledge and go into the level of detail that would be too much for a standard blog post.

eBook example >

2. Resource Guide

A Resource Guide is a collection of recommended items that the reader can purchase in order to achieve a better result. These recommended items could be anything. From books to apps, websites or even physical products.

Resource Guide example >

3. Checklist

A Checklist is a series of actionable tasks that help the reader to implement a particular strategy.

Checklist example >

4. Workbook

A Workbook is a teaching resource that you can use to help your readers work through a particular activity. Workbooks are more interactive than the average lead magnet because you will give your readers a series of tasks or questions and have them answer them in the space you have given.

Workbook example >

5. Email Templates

If you are giving your readers a sample of content that they should send as an email then the Email Templates format is perfect. This lead magnet will clearly show what subject line to use and what to write in the body of the email.

Email Templates example >

6. Video Lookbook

A lookbook is a collection of visual samples which are usually curated from third party sources. Sometimes all people need is a little inspiration and best practice examples from your industry can help to inspire and motivate your audience.

Video Lookbook example >

Whichever format you choose will include some helper content to get you started. You can replace this helper content with your own.

Editing your first lead magnet

If you followed the instructions in our previous article then you’ll have a basic lead magnet set up.

Now it’s time to edit that lead magnet.

Use the left-hand menu to navigate to the ‘Lead Magnet Dashboard’.

Now, ensure that ‘Your Lead Magnets’ tab is selected:

And finally, click the title of the Lead Magnet that you want to edit:

Once the Beacon editor opens you will see this screen:

You can edit pretty much change anything you see but before we dive in, let’s review some quick Beacon terminology:

Document
You’ll see this referring to your lead magnet as a whole. Document settings, for example, are used to change the overall settings for the entire lead magnet (versus a single page). Learn more about document settings here.

Page
Every lead magnet is made up of pages. These are the foundation of your lead magnet.
Learn more about Page Settings here.

Card
Cards make up the elements on the pages. Cards are pieces of content, the creative elements. A card could be a text block, an image, a headline, a spacer, and more.
Learn more about Cards here.

Now onto the fun stuff!

Editing the layout and design

To edit any element on a page, just click it. When you click the element it becomes active and the menu on the left hand side will change. In this example we have clicked on the headline to activate it:

You can also highlight text on the page and replace it with your own text:

You can go through each page in your document and make changes in this same way.

Once you are happy with the look and feel of your document just click ‘Publish’

Click here to learn more about the publishing process.

Background Image Settings

When you add a background image to a page there are 3 different settings that you can use:

1. Stretch

This option ensures that the background image takes up the full of the page.

When you use this option some of your image may be cropped out of view. When this happens you can move the image around within the page by using the horizontal and vertical sliders:

2. Repeat

This option will ensure that your image is repeated several times to fill the entire page area.

3. Position

You can place your image anywhere on the page background with this option:

Use the horizontal and vertical sliders to move the position of the image on the page:

Resizing Images

There are 2 ways to resize an image, depending on what type of image it is.

1. Resizing an Image Card

You can resize an image card by clicking on the image and then using the slider on the left hand side:

2. Resizing an Inline Image

If your image is part of a Text Card then you can resize the image directly on the page. First, click the image to activate it. When the image is activated it will have a small square in the bottom right hand corner:

You can click and drag this square to resize the image:

Adding Images to a Page

There are 3 ways to add images to a page within a Beacon document:

1. Using Image Cards

You can add an Image Card to the page from the drag and drop menu on the left hand side:

2. Using Image Gallery Cards

If you want to add multiple images in a gallery format you can drag the Gallery Card onto the page:

See this article for more information on using gallery cards 

3. As part of a Text Card

If you have a Text Card on a page you can add an image via the formatting menu. Just click the relevant Text Card and then select the ‘Images’ button as shown below: