Viewing All Posts By
admin

Changing User Access Levels

Please note that this feature is only available on the Agency Plan

You can add up to 5 people extra users within your Beacon account.

First, navigate to the users tab within the settings page:

Next, click the permissions icon of the user that you will change permissions for:

Now you can decide what actions that user should be able to perform inside your Beacon account.

These actions are split into four categories:

1. Lead Magnets

Give users the ability to create new Lead Magnets and access Existing Lead Magnets.

More Information

2. Lead Capture

Give users the ability to create new Lead Capture Forms and access existing Lead Capture Forms.

More Information

3. Resource Libraries

Give users the ability to create new Resource Libraries and access existing Resource Libraries.

More Information

4. Custom Domains

Give users access to individual custom domains within the account.

More Information

Promoting Beacon

We have created a range of resources specifically designed to help you promote Beacon to your network.

You can find all these resources in this Google Drive folder.

Included in the folder is:

Beacon Logos

A few variations of the Beacon logo in different colors and different sizes.

Beacon Screenshots

If you are writing a blog post about Beacon then you may want to include some screenshots of the software in action. You can take your own screenshots or you can use the ones that we have prepared for you.

Beacon Webinar

We have included full slides and script for a webinar introducing the concept and importance of lead magnets. You can present this webinar to your audience or if you have a mailing list of more than 5,000 people we can co-present it with you.

To apply for a co-presented webinar please complete this form.

3D Cover Image

As part of the lead capture feature Beacon generates a range of cover images with special effects like 3D.

First, navigate to the Lead Capture dashboard and create a new opt-in form:

Cover images are automatically generated for all lead magnets created in Beacon so be sure to choose the ‘Use Beacon Resource’ option:

Select the lead magnet you need the cover image for:

Choose one of the formats shown here:

Then select any of the templates by clicking on it:

After you give your form a name you will be taken to the Lead Capture Editor.

Now, ensure that the first tab is selected and choose the effect for your cover image. In this example we have picked the ‘3D book image’

Finally, right click on the cover image and select ‘save image as’

You can then choose where to save the image on your computer.

What’s The Difference Between Each Lead Capture Format?

Horizontal Bar

An eye-catching bar that can be pinned to the top or bottom of the browser window.

Inline Form

The form is embedded directly in the web page so there is no popup.

Content Upgrade

Your call to action will be embedded in a web page. Once people opt-in they will get the lead magnet via email.

Popup Delay

The popup form will appear after the user has scrolled down the page or been on the page a certain length of time.

Link Lock

Share your lead magnet with a single link. People will have to share their email address before they can read it.

Introduction to Lead Capture

Once your lead magnet is created you can use it to start collecting email addresses on your website.

First, navigate to the Lead Capture dashboard

And create a new opt-in form:

Each Lead Capture Form will reward people with a resource when they enter their contact details.

This resource can be a lead magnet that you have created in Beacon or a file uploaded from your computer.

Choose which option you prefer:

If you choose to use a Beacon resource you can select it by clicking on ‘select’

Next, choose a format for your form:

Not sure which format to choose? Learn the differences between each lead capture format.

Then select any of the templates by clicking on it:

You then have the opportunity to customise your lead capture form in the editor:

There are various different stages within the lead capture process. You can access each one of these stages via the top menu:

And you can edit the individual elements with the left-hand menu:

Once you have made all the necessary customisations you should navigate to the publish section:

The publish instructions will vary depending on the lead capture format that you chose. In this example you should copy the code shown:

And paste it on your website:

You can find more information about embedding lead capture forms on your website in this video:


Formatting Menu

When you are editing either a Headline Card or a Text Card a formatting menu will appear at the top of the page.

This menu helps you to format any highlighted text within that card.

Both the Headline Card and the Text Card have different formatting options:

Headline Card

The formatting menu for Headline Cards contains the following options:

  • Bold

  • Italic

  • Link

  • Text algin

Text Card

The formatting menu for Text Cards contains the following options:

  • Format (heading, normal text etc)

  • Bold

  • Italic

  • Table

  • Link

  • List

  • Image insert

  • Video embed

  • Checklist

Autosave

If the ‘autosave’ feature is enabled then Beacon will automatically save your document every 5 minutes.

Click the ‘autosave button’ to disable this feature:

Zapier Integration

When you generate a new lead you can choose to send the subscriber’s information directly to your Zapier account.

Step 1 – Add A New Provider

Visit the email integrations tab of your account settings, click the ‘add a new provider’ button:

Step 2 – Save This Zapier Account

Choose Zapier from the Providers dropdown menu.

Since you can connect several Zapier accounts to Beacon it is a good idea to give each one a unique name so you can refer back to it later.

Once you’ve done this, click ‘add integration’

Step 3a: Lead Capture – Copy Your Authentication Code

If you are creating a Lead Capture Form then you can copy your authentication code (This is the code we are going to use later in the Zap for “Form ID”) from the ‘Actions’ screen:

Step 3b: Resource Library – Copy Your Authentication Code

If you are creating a Resource Library then you can copy your authentication code (This is the code we are going to use later in the Zap for “Form ID”) from the ‘Opt-In Settings’ screen:

Step 4 – Create A New Zap

While we are waiting for the Beacon Zapier integration to be made public, please use the following URL to find Beacon:
https://zapier.com/developer/public-invite/76801/e786437d0bc2b40328a4c6cfeaa7ec4f/

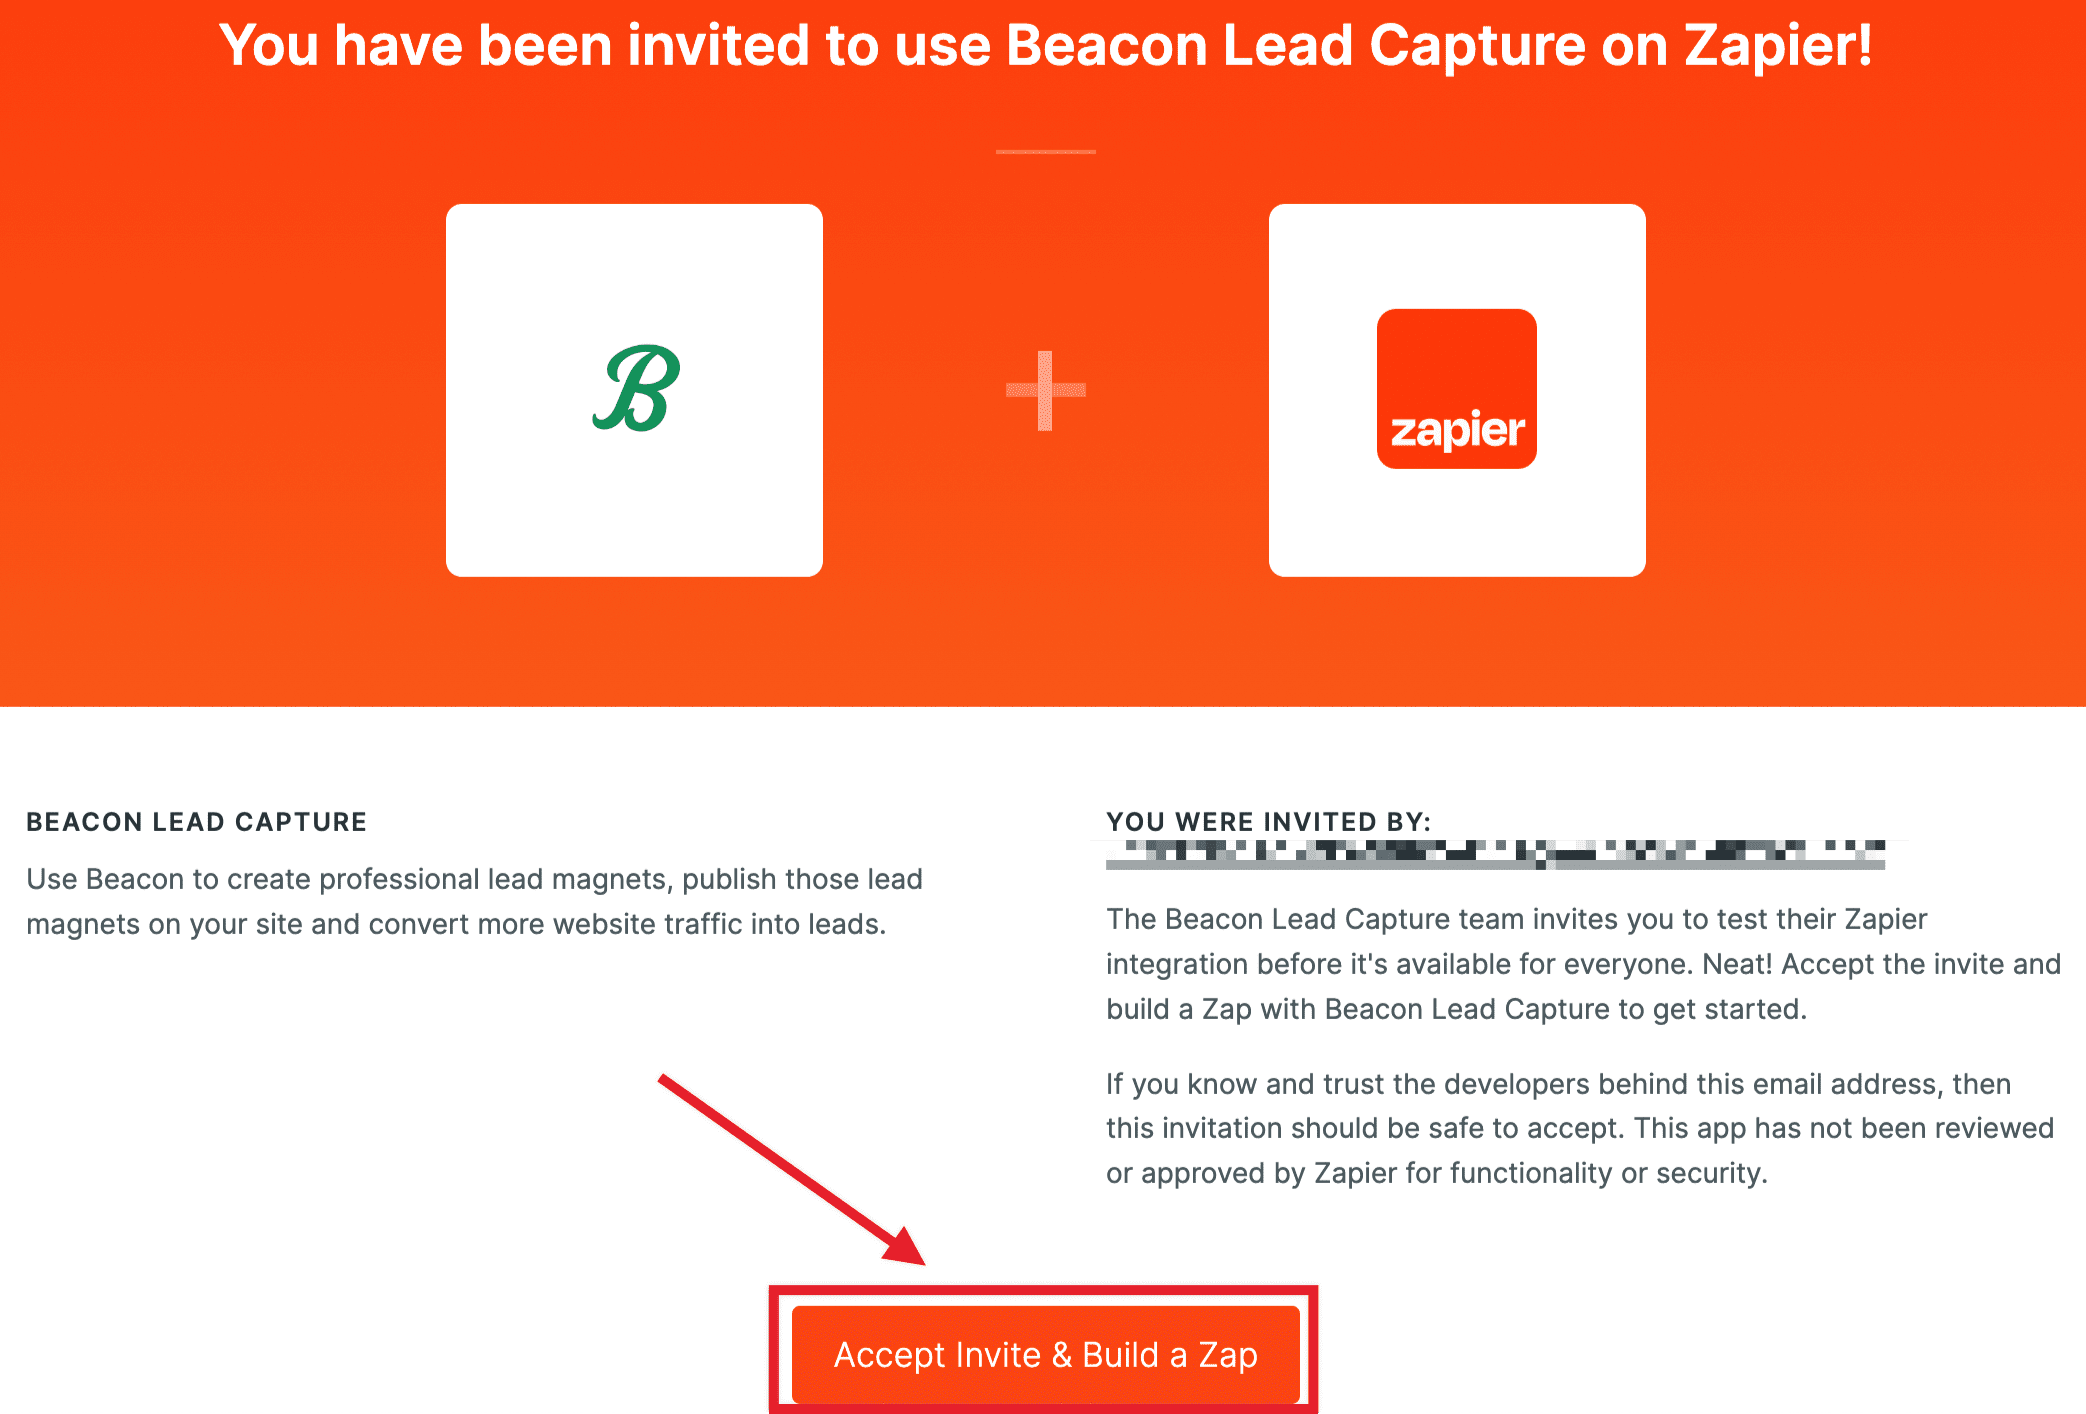
Click the Accept Invite & Build a Zap button:
Markup 2024-02-27 at 19.37.40.png

On the next screen, click on + Create >> New Zap

Markup 2024-02-27 at 19.40.45.png

On the next screen, click on Trigger, search for Beacon, and select Beacon Lead Capture
Markup 2024-02-27 at 19.43.35.png

On the next screen, click on Event, select New Subscriber and click Continue

Markup 2024-02-27 at 19.48.59.png

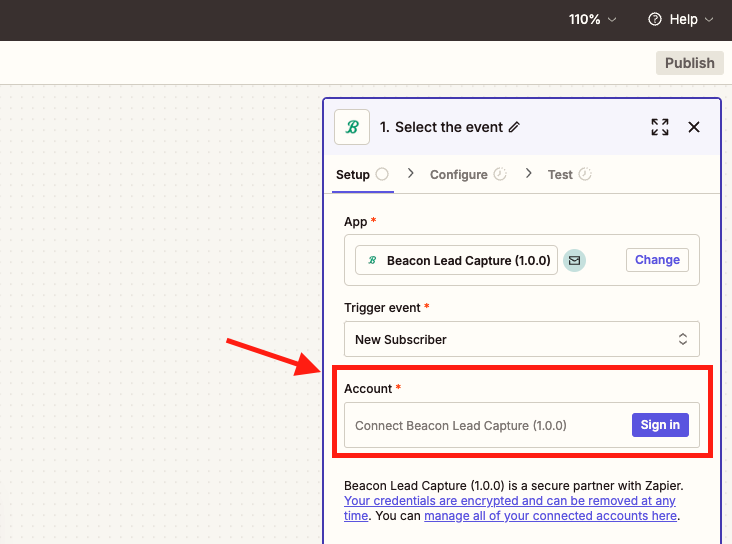
Click on Sign in

Markup 2024-02-27 at 19.50.05.png

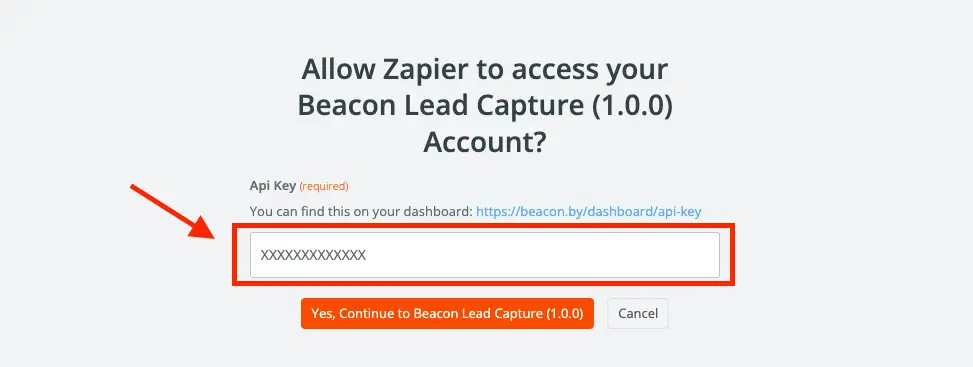
You will then need to authenticate your Beacon account using your API key. The API key can be found at: https://beacon.by/dashboard/settings#/api-key

Markup 2024-02-27 at 19.51.03.png

Once authenticated, click on Continue and specify the Form ID we captured in steps 3a or 3b above:

Markup 2024-02-27 at 19.52.53.png

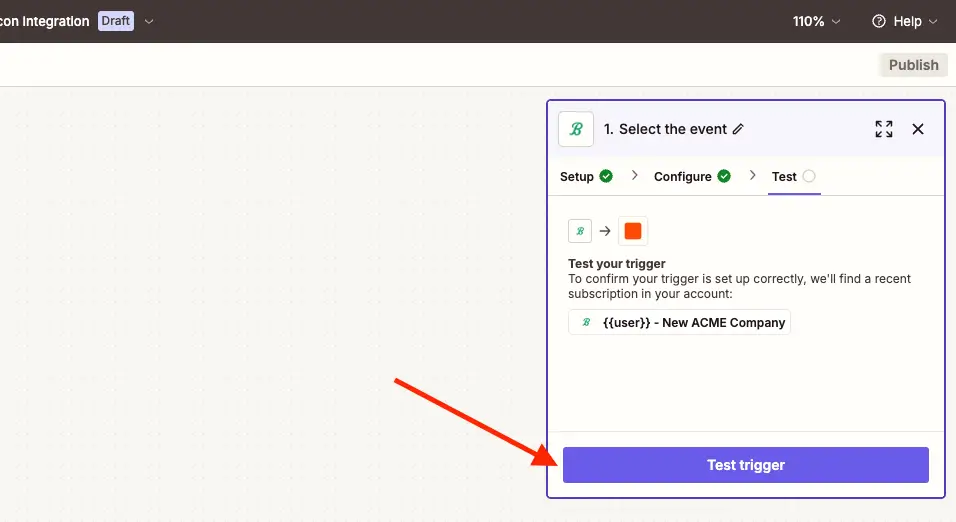
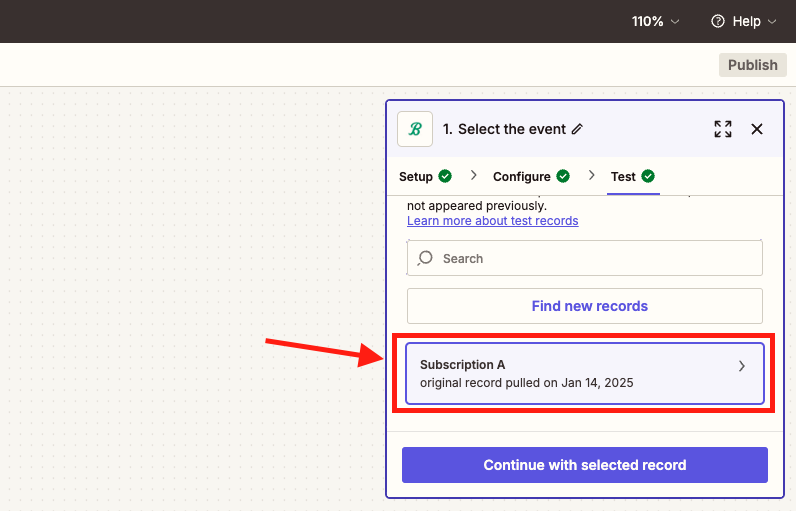
After entering the Form ID, click on Continue and click on Test Trigger

Markup 2024-02-27 at 19.56.54.png ​

What Is A Custom Domain?

Whenever you publish a Smart PDF with Beacon, our website address is included in the URL. It looks like this:

This is the default setting but it might confuse some of your readers. They’ll probably see that and think “Huh? What’s a Beacon?! I don’t know these guys!”

Don’t worry, we won’t get offended but it’s probably a good idea for you to clear up any confusion sooner rather than later so you don’t risk the trust of your audience.

Thankfully you can do that with our custom domain feature. Once you set that up you can use your own web address. It would look something like this:

See here for full details on how to setup your own custom domain.

Professional Plan

If you are on the Beacon Professional Plan then you can use one custom domain for your account. This is useful if you only plan on publishing Smart PDFs for your own website.

Agency Plan

If you are on the Beacon Agency Plan then you can use as many custom domains for your account as you need. This is useful if you are publishing Smart PDFs on behalf of multiple clients.


ConvertKit Integration

When you generate a new lead you can choose to send the subscriber’s information directly to your ConvertKit account.

Step 1 – Add A New Provider

Visit the email integrations tab of your account settings and click the ‘add a new provider’ button:

Step 2 – Connect To ConvertKit

To connect to ConvertKit you will need your API Key and your API Secret. You can obtain these from ConvertKit here.

Enter these details in the form as shown below and click save.

Step 3a: Lead Capture – Select A Tag

If you are creating a Lead Capture Form then you can select what ConvertKit tag should be applied to each subscriber via the ‘Integrations’ tab:

Step 3b: Resource Library – Select A Tag

If you are creating a Resource Library then you can select what ConvertKit tag should be applied to each subscriber via the ‘Optin Settings’ screen:

SendFox

When you generate a new lead you can choose to send the subscriber’s information directly to your SendFox account.

Step 1 – Add A New Provider

Visit the email integrations tab of your account settings, click the ‘add a new provider’ button:

Step 2 – Connect To SendFox

Choose Sendfox from the Providers dropdown and enter your Personal Access Token as shown below.

You can obtain your Personal Access Token from SendFox here

Step 3a: Lead Capture – Select Your List

If you are creating a Lead Capture Form then you can select which Sendfox List each subscriber should be added to:

Step 3b: Resource Library – Select A List

If you are creating a Resource Library then you can select which Sendfox list each subscriber should be added to via the ‘Optin Settings’ screen: